Saturday, March 14, 2015

Testing Amplifier Sound Quality


This is something I have though about a long time now - finding a method to reliably verify sound quality differences in power amplifiers.

Finally I have set up the necessary instrumentation to try out the method in practical experiments.


Purpose

Today good sound is easy to achieve, most of the audio playback chain can be made sonically transparent with relatively little effort and money spent.

However, through building and designing amplifiers myself, and measuring and listening to many different amplifiers, I have got this controversial idea that power amplifiers can actually sound different.

Obviously they sound different if you push beyond power limits, and also amplifiers can be made so good that they are transparent for any source material.

But where is the limit, how good does it have to be, and what measurements can reveal the transparent ones from the only-good ones.


Method

The problem with listening tests for verification is that it is time consuming, unreliable and difficult to do proper blind testing of amplifiers.

If you could test using a software abx-tester, like the one in foobar, the task would become easier.

By recording the output signal from the amplifier while playing at decent volume, you get a sample file that can be compared to the original in an abx software player, and you can do the comparison on any playback system - headphones, speakers.

The playback will of course be affected by the amplifier in use for playback, but considering descriptions of the seemingly huge sonic differences described in reviews, it should not be a problem to hear at least some of the sound characteristics from the test object. 


Method for amplifier abx-testing; The blue boxes are sound data files, the green boxes are test instrumentation and should sound transparent, the red box is the amplifier being tested: 


Verifying the recorder

After rigging the recording system, the first task is to verify that the recorder is sonically transparent, or at least much better than the amplifiers I want to test.

The first recorder system is made easy and practical, thought I could test this first, if it fails I have some options to improve it if necessary.

I recorded some samples from the output going to the amplifier, so that I can use abx to verify if there is an audible difference from the original sample to the recorded sample - with no amplifier in the loop.

I also took one of the samples and sent it through this loop 5 times, as I suspected the differences would be too small to be detected.

If the 5x loop sample still sounds good, then the recorder can be assumed to be good enough for the purpose.

After several attempts trying to get an abx with positive outcome, I conclude I am not able to hear any difference from the original and the 5x looped sample.

I used two different set-ups with different speakers and amplifiers, and I used headphones.

It might be interesting to observe that the recording loop includes the DAC and pre in a commercial avr.

To test that the method actually can detect differences in sound quality I encoded 128K mp3-samples and compared those to the original.

All mp3-files tested positive.


The instrumentation is verified by abx testing of Instrumentation for playback and Recorder - the green boxes:


Amplifier testing

I recorded 3 amplifiers, they are quite different in topology and also measures different, though amp 1 and the C15 both measure very good on parameters assumed to have significance for sound quality.

The problem now is that I have a very hard time trying to hear any difference between any of the amplifiers and the original sample.

I uploaded sample files to the web site, they should be accessible by typing this link:
www.kvalsvoll.com/Articles/abx/

They are tagged with a very brief descriptive title.

Start by looking at the tuttabella_test files, do an abx of the mp3 - it is harder than you think..

The sample files are music and signal samples, in original version and sampled from the loudspeaker output of the amplifiers.

Amp 1 is a very good commercial amplifier.
Amp 2 is a low-budget avr.
C15 is a 15W design by me.

The music samples are chosen to cover different genres and style, but also for ability to reveal differences.
Lots of high frequencies and voices in the Tutta Bella should be good for this purpose, the Stinky and Humming samples are more electronic and jazz-funk style with dynamics and full frequency range.

The 19K+20K signals reveal high-frequency intermodulation.
If you can not hear above 19K, all you hear is distortion, younger people may find it very annoying.
The distortion will sound like high-frequency hiss, and a tone at lower frequency, more specific 1KHz.

The 4K+10K+16K is meant to reveal high frequency distortion, mainly intermodulation, while the distortion-generating tones are also clearly audible.
The distortion will sound like high frequency hiss, and a metallic tone.
The tones are very annoying to listen to, and you will need to listen quite loud to have any chance of hearing any distortion.

WARNING:
Some of the files contain signals that may or may not be audible - DO NOT TURN UP THE VOLUME BEYOND NORMAL LOUD LISTENING LEVEL.

You may end up destroying tweeters or amplifiers, be careful.


Update 20.03.2015:
All music samples were recorded with the amplifier playing at a decent volume into a real loudspeaker load - just like you would normally listen to music.

Level was set to -3dB below clipping for the small C15 amplifier for 0dBFS from digital source material. This equals a peak level of 10W into a 8 ohm load.


Not conclusive

I have not yet managed to get a positive result for the music samples with amplifiers.

I made the im_* test signals to see if some very nasty test signals works better.

And they do - I can verify a difference between amplifiers and original for those signals, which is interesting, because that indicates a possibility for audible differences in amplifiers.

Further experiments could be to record amplifiers looped several times, a 4x loop will increase nonlinear distortions by 12dB, while noise only increases 6dB.
If this is enough to clearly reveal differences in sound, it may be used to learn and train hearing perception because you now know what to listen for.


Update 23.03.2015:

Sample files updated due to an error on all 44.1K sample files, the error is audible on the multitone samples im2, im3.


Music samples are now gain matched within 0.1dB.

Additional samples from instrumentation test loop added, these are labeled xxx_test. 
The 5x loop test is removed, now replaced by an updated 4x loop test.

It is recommended to update your sample files if you already have downloaded any previous version.

Sunday, January 11, 2015

Center distance adjustment done correct


Learn how to set the center distance distance correctly to get the best sound.


Center distance setting

The center distance is a setting in the processor/AVR, affecting time delay of the center channel relative to the other speakers.
The value is set by automatic calibration, or manually, to the physical distance from the listening position to the center channel speaker.
We will see how more accurate fine adjustment of this distance can improve sound quality and how to do it.

Effect of center distance

The distance setting affects the timing of the signal to the center, and thus the summation of signals across the front stage.
If the three L, C, R front speakers have different timing, the summed frequency response will not be correct.
In particular sounds that are panned across the front will be affected.

If the phase response from the center is different from the L R mains speakers, it will not be possible to get a smooth total response.
The concept of "timber matched" speakers is quite misunderstood, as it is not the typical small differences in frequency response amplitude that causes problems, but differences in phase response and off-axis radiation.
The center speaker must have a phase response and radiation pattern similar to the L R speakers to be able to provide seamless front stage sound.

If the distance is far off, more than 20cm, the low frequency response will be affected.
Smaller errors down to around 2cm is perceived as loss of focus and clarity at higher frequencies, for signals spread out on all front speakers.
For movie dialogue recorded only in the center channel there is no difference, even for large deviations.
So, for those hoping this is a way to move the center sound image further away from the listening position, to make it more similar to using a phantom center, unfortunately that does not work.

How to verify center distance

We can use a correlated pink noise signal played through all front channels and monitor the frequency response to see if the channels sum correctly.
Wrong timing will show up as comb filtering, visible as dips in the response.

How to adjust center distance

Start up your functional REW or similar acoustic measurement set-up, and open the RTA real-time analyzer.
We will use correlated pink-noise for measurement signal:

Correlated pink noise signal for LR
Correlated pink noise signal for LCR

You can create your own correlated noise signals by first making one channel pink noise, then copy this signal to the other channels.

Frequency response graphs shown are from RTA with settings for quick and reasonably correct presentation of the situation above around 1KHz, at low frequencies the graphs are not accurate.

First, we must align the microphone exactly between the front L and R at the listening position.
Do this by playing a correlated pink noise signal in L and R, and move the microphone sideways until the response is most flat at high frequencies.

Mic alignment: Initially, the mic is far off:


Mic alignment: Getting closer:

Mic alignment: After fine adjustment within approximately 5mm:


Set the center channel distance to a reasonably correct value, within say 20 to 50cm.
Also check that the center channel level matches the front L and R, and adjust if necessary.
Then play a correlated pink noise signal in all L, C, R channels, and adjust the center channel distance in small 1cm increments until the response is as flat as possible.
It may show a slight roll-off at higher frequencies, as even small differences in phase response between center and L, R will have significance.

Center distance: Initally, we see the signals do not sum up correctly, there is visible comb filtering:


Center distance: After adjusting the center distance within +-1cm:


Subwoofer system integration

At low frequencies the integration to the subwoofer system is affected, and this is solved by adjusting the distance for the subwoofer system.
Subwoofer distance adjustment will be covered in a coming article.


Thursday, September 4, 2014

Bass EQ for Movies - How to improve sound quality on bass filtered movies


Would it not be great if you could bring back the lost bass in you favorite movies?
Well, perhaps you can.
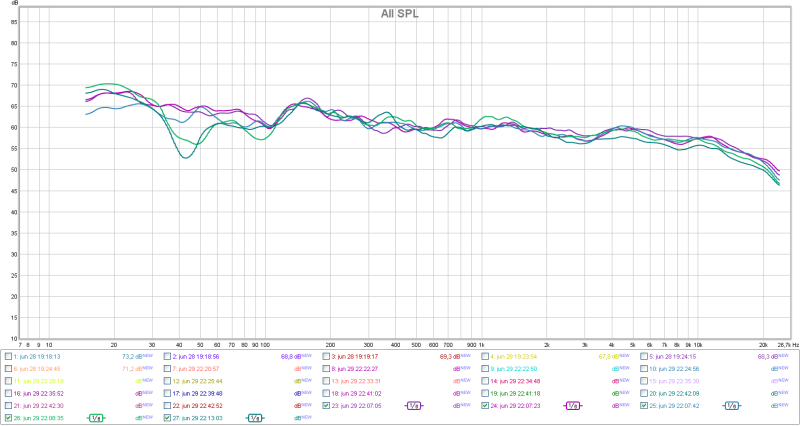
By applying equalization customized for each movie during playback, it is possible to dig out some of the low bass lost due to filtering and processing in the studio.  
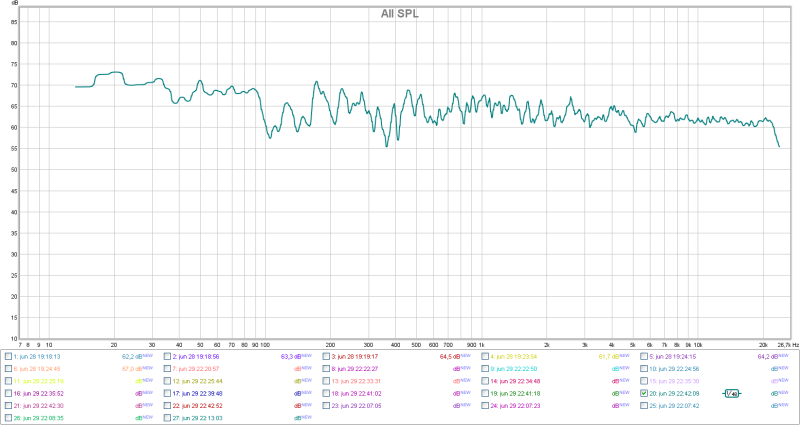


Why Bass EQ


When movies are mixed in the studio, the sound will be adjusted according to what they hear in that studio.
Sometimes limitations in the playback equipment, such as speaker system, will lead to adjustments that will compromise sound quality.

Typical examples of such undesired adjustments are high-pass filtering that removes the lowest frequency content.
On a limited system this may sound better, because the removal of content that can not be reproduced anyway will increase headroom for the mid and upper bass frequencies.
When played back on a full frequency range system the filtered version looses weight and impact, and also tend to sound less natural.

If this filtering is done in one of the very final stages of production, then it is a good possibility that at least some of the filtered content can be retrieved.
This is what Bass EQ tries to do.

The better your playback system is, and if you also like it loud, like 0dB/reference, then the difference will be very significant, and on some movies the whole experience is lifted to another level.
But also if you play at lower volumes, say -20dB, perhaps you have some smaller but still nice and good quality subwoofers, then the difference will most certainly be very noticeable.
This is not only about more shake and physical impact at house-wrecking volumes, the overall sound quality is improved when the natural wide frequency range of is restored.


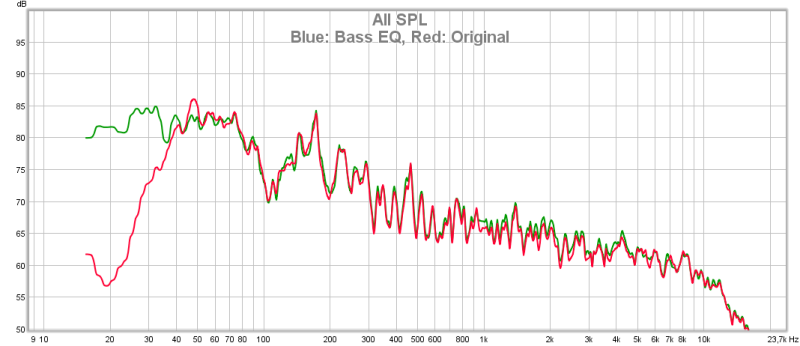
Example frequency spectrum plots playing this scene from the movie Battleship:


Battleship, original and Battleship with Bass EQ playback:


There is a huge difference in output at low frequencies, and listening easily reveals that the perceived increase in sound quality is significant and very far from subtle.


How to Bass EQ


You must be able to implement equalization according to the Bass EQ graph for each individual movie.
This can be done in a DSP, if you have something like that in the playback chain.

In a bass-managed system the Bass EQ can be implemented on the subwoofer channel.

Computer playback is increasing in popularity, and it will eventually be the preferred playback device for all media content.
Then it is likely that equalization can be done very flexible and accurate using a plug-in or built-in processing in the player software.
JRiver media center is an example of player software that can do Bass EQ with individual settings for each move.

A simple graphical equalizer or bass tone control will not be able to provide Bass EQ.

To verify your equalizer setting you can play a pink noise file and compare the frequency responses - the unfiltered pink noise should be flat, and pink noise with Bass EQ should look similar to the Bass EQ curve.

Some movies require a very large boost at low frequencies, perhaps in the order +20dB gain below 20Hz.
This requires careful attention to what you are doing.
If such a filter is left in unintentionally, and you play a movie with flat full frequency content, something will overload.

Some movies are quite heavy in the mid bass region, equalizing this down will gain some headroom for the low bass as well as improving the overall spectral balance.
If there is noise at frequencies below usable output, say around 10Hz and below, then this can be removed using a high pass filter, and some more headroom is gained.
If the sound track is mixed very loud and dynamically compressed, there may not be enough headroom for the low bass we bring back, and the only solution is to reduce the level before applying the Bass EQ.
The lost gain is restored later in the chain, perhaps as simple as adjusting the master volume.
Exactly how this is done depends on what it used for equalization; different dsp and software may require different approaches.


How to recognize good candidates for Bass EQ and what to fix


Any movie where sound effects and bass is lacking in weight are potential candidates.
Looking at the Peak-Average graph from the The Low Frequency Content Thread (films, games, music, etc) thread can tell a lot about how a movie sounds.


Kon-Tiki is a film with a good sound track utilizing the whole frequency spectrum, observe that the curve is a slightly tilted line extending all the way down to the very lowest frequencies:


The storm scene has content all the way down:


This film does not need any Bass EQ.


Battleship has met with an accident somewhere in the sound-making process:


There is an obvious drop right below 35Hz, looks like a steep high-pass filter has been applied.
This is something to work on for Bass EQ.

A good target response is likely an approximately tilted straight line, that extends as low in frequency as possible.
Start with applying equalization that bring the Peak-Average curve closer to this straight tilted response.
Evaluation by listening is necessary to determine appropriate equalization, and care must be taken to ensure not to clip the signal anywhere in the chain.

How low in frequency should you try to equalize to flat. 
Depends on the original sound design, and whether there is any content to dig out, it may be buried in noise at the very lowest frequencies.
Fixing something destroyed with a 30Hz filter and mangaging to retrieve flat down to 20Hz can make a huge difference.
If you can extend it down to around 15Hz, even better.
Below around 15Hz is questionable, certainly depends on your playback system, as tactile feedback from floor or moving house structure may be required to notice it at all.
The lower you go the greater the risc of amplifying noise instead of usable content, and if you can bring a sound track with virtually no low bass back to life with significant content down to 15Hz, I would say that is a very good achievement.


Gravity, opening scenes (RTA from playback):


This film has a droning, constant tone around 20Hz, as can be seen in the curve.
This is part of the sound design.
The level below 20Hz drops off very quickly, but it is not likely that equalization can bring improvements, because likely there is no content that has been removed.
The relationship between frequency and time dictates that continuous tones, which have a long time span, are narrow in frequency distribution.
Impulse like transients, like cannons and gunshots, have short time span and a wide frequency distribution.
If there are no impulses, there may not be low frequency content to retrieve.

When the Explorer is hit by the debris, there are sound effects added that adds to the sensation of the incident, these sounds are more dynamic and impulse-like:


The spectrum reveals that there is content below the 20Hz drone, and that this content may have been filtered using a steep high pass around 20Hz.
Gravity is another candidate for Bass EQ.


Avatar, flight scene (RTA from playback):


This scene sounds good, the feeling of realism and athmosphere is good.
Right at the end of this scene, where the plane drops down the cliff, there is a sense of weightlessness, making it feel like you are on the plane.
The spectrum reveals why this effect is so good - there is significant content at the very lowest frequencies, peaking around 13Hz.


Avatar, monster stomp-stomp (RTA from playback):


Here the stomps sounds rather boomy and does not have the appropriate feeling of weight and impact.
The spectrum reveals why - the low frequency content below 25Hz is removed.
Considering the previous flight scene, the conclusion is that finding the best Bass EQ for Avatar will be a compromise.
Some scenes could benefit from a huge low-frequency boost, but then other scenes would sound horrible with too much in the low end.


Movies improving with Bass EQ


There is now a thread at data-bass listing Movies with Bass EQ:

The Bass EQ for Movies thread

Data-bass also hosts lots of other content about movies, subwoofers and sound quality related topics.
The Low Frequency Content thread is a highly regarded source for information about movie sound tracks.

Friday, August 8, 2014

My Bandcamp Music


On Bandcamp.com I have found lots of interesting music of very high quality, music that would never have reached me through old media distribution channels.  


A better way for music distribution

Bandcamp is a web-site where you can listen to and buy music.
You can buy for download directly to your computer, no need to hassle with ripping CDs any more, and lossless formats are available so you do not have to worry about encoding quality.

Today, when physical media such as CD is disappearing, many find that streaming services like Spotify is a good source for music.
However, there are very good reasons to prefer services where you buy and acquire the music and download it for local storage, on your own hard drive.
At least for the enthusiast, who cares about quality, this is the only way to ensure you have the right version of your favourite albums, and it will not suddenly go away if the streaming service goes down or you simply loose your internet connection.

I present for you some examples of music I have found, and describes what makes those special with respect to how they sound.
As I say on my Bandcamp page; "My review comments focus on sound - not many do so, and others are far better on the music part." 


Electronic 


The Flashbulb - Reunion:
A masterpiece of dynamics and excellent sound production.
Note the impact of the drums of tracks like Oak Lawn UFO and Walking Irrevocable.
But be warned, this is electronic, and everything is allowed, sometimes effects like distortion and changes in tonal balance are used in ways that can seriously disturb the typicial audiophile ears.
The dynamics and general composition makes it possible to play very loud and it will still sound quite pleasant, there is no Loudness-war disease here.

Emancipator - Safe In The Steep Cliffs:
What makes this special is the lively and exciting sound.
Listen to, or rather, feel, the drums on Rattlesnakes, note the big difference in both sound and tactile feel between the sharper smaller drums and the larger bass drum.


Panda Dub - Antilogy:
A dub production with unusual good overall sound quality, dynamic and detailed, pleasant to play loud.
If you like this one you should check out Panda Dub's other releases, particularly the older ones.


Instrumental


Emily Davidsson - BASS SOUNDS: Music for Unaccompanied Cello from the Early Baroque: 
This is a musical and technical masterpiece.
If you think this should be easy to do right - only one instrument, then check out some other releases in the same genre of classical music with few instruments, nowadays quite many of those are destroyed by bad production.

Seems Like Old Times:
A Jazz band in my room, simply.
No attempts to polish or amplify or make things sound bigger than they are.
And it is this simple and plain approach that actually achieves what others with large budgets and names try to do using boosts in the bass, compression, limiters, more compression, and eventually ending up with a flat and unnatural sound.
Turn it up and this sounds huge, dynamic and natural, it achieves to transfer some of the energy and liveliness of live music.


Join and find hidden treasures yourself


I have no affiliation to Bandcamp.com, I only encourage you to join and support the music and distribution platform, contribute by posting about music you find there, and enjoy the diversity of popular and established artists as well as the new or specialized ones.
Look at my personal collection at bandcamp.com/oyvindkvalsvoll to see what I have found, and then you can use the bandcamp.com/discover to search for music.


Sunday, July 6, 2014

Pink Noise Calibration


Measuring more than one speaker and getting predictable and usable results can be challenging.
 

Using pink noise and a real-time analyzer makes it easy to check level and frequency response, and you can move the mic around to measure at different locations and still get meaningful observations.


Purpose

When setting up a sound system you need measurements to verify what is going on with the sound, and the frequency response is the most important characteristic.
Location of listening positions and speakers, eq settings, room correction and room acoustics all affect the response.
To be able to make adjustments in the right direction it is necessary to measure.


Problems with sine wave sweeps and multiple sound sources

Sound from more than one speaker will sum up in strange patterns depending on type of sound, room acoustics and microphone position.
It is possible to measure two speakers with sine sweep, but that requires some understanding of what is going on, and the mic must be located within few mm exactly between the two speakers.


The uncorrelated pink noise solution

By using uncorrelated pink noise sent to all speakers the individual sound sources will sum more correctly like music or movie sound.
The frequency response can be observed using a real-time analyzer, which means you can see the frequency response changing when moving the mic.

By having multichannel pink noise files with different channel configurations it is quick and easy to measure different speakers in a surround system.


Limitations

Pink noise and real-time analyzer method can only verify level and frequency response.
For other measurements, such as distortion and impulse response, it is necessary to measure with sine sweep, each speaker individually.
Also, there is no possibility to isolate the speakers direct sound from room reflections using gating, the pink noise will always measure all sound including all room contribution. 


Tools

You need REW measurement software and a calibrated microphone.
The software is free, and a good mic is cheap compared to what many are willing to pay for potential upgrades to their sound system.

Pink noise files can be downloaded from my web site:

pn full_fr -20dBFS 15s 7_1.flac
pn full_fr -20dBFS 20s L+R.flac
pn full_fr -20dBFS 20s LCR.flac
pn full_fr -20dBFS 20s C.flac


How to measure

- Play the pink noise file that corresponds to the speakers you want to measure.
- Open the RTA in REW
- Select Mode: RTA 1/48 octave
- Select FFT Length: 32768
- Select Averages: Exponential 0.88

A scaling where the 5dB/div lines are visible is fine.

Now you will see the frequency response being continuously updated, and you can move the mic around to check various positions.

A "good" response is one that most closely follows a tilted line, where the amount of tilt depends on room acoustics and preference.
Typical tilt is from 0dB (flat) up to around 10dB from 20Hz-20KHz, and generally a more live room has more tilt.
If you can get within +-5dB that is generally considered good. 

For single speaker measurements you can use the PN Pink Noise generator in REW, for more speakers this will not work because the noise signals will be correlated and will not sum up correctly. 

REW measurement software RTA window


Example measurements


7.1 System at multiple seats

I wanted to verify the response in The Moderate Cinema from all speakers, and see how it changes at different seats.
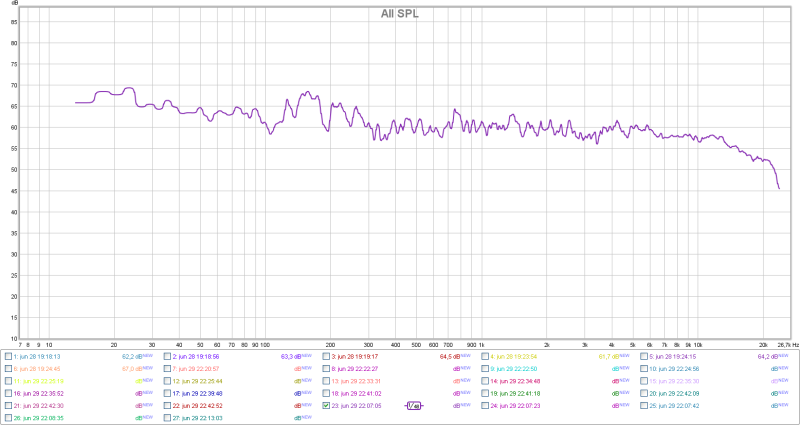
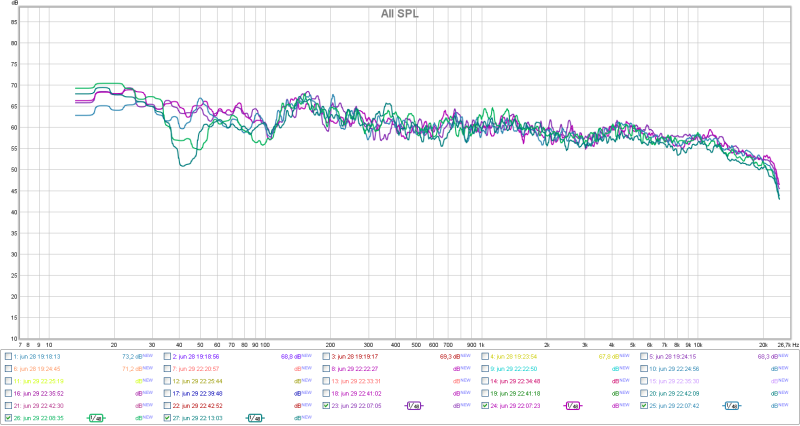
Response is nice and even across the mid range, the roll-off above 10KHz is due to the surround speakers falling off because they are not on-axis.
At low frequencies the better seats are good, but the two on the far left have some large dips.  

Pink noise all 7.1 channels, seat 1


Seats 1 to 5


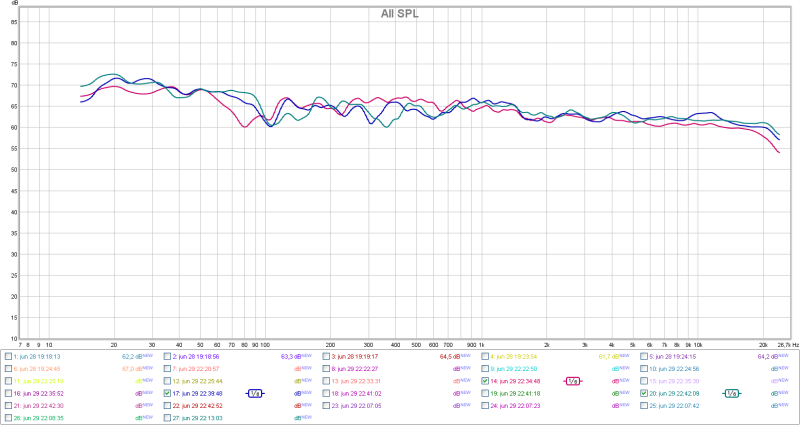
Seats 1 to 5, 1/6 oct smoothing


L+R at multiple seats


The front L and R speakers are the most important, and especially for music it is important to have good linearity in the response for these.
For music listening we choose fewer seats, and see that seats 1, 2 and 4 has reasonably good response. 

L and R, seat 1


L and R, seat 1, 2, 4, 1/6 oct smoothing

Tuesday, May 6, 2014

How to make Audyssey room correction work


How to fix a too-bright Audyssey calibration

Audyssey room correction is included in many of the most popular AV-receivers.
By making adjustments to reduce the effects from bad room acoustics or bad speakers, Audyssey improves sound quality. 
And even for good systems in good rooms there may be a significant gain in clarity and definition of the sound.

However, limitations to the Audyssey implementations causes failure when used with some speaker and room combinations.

I will show what goes wrong, and how to make it work.


Initial calibration

This system consist of controlled directivity main front speakers and 4 compact Horn subwoofers located in the corners.
Distance, level and crossover settings are carefully calibrated, to give a reasonable flat tilted frequency response and volume level calibration according to 85dB SPL for -20dB master volume.

After running Audyssey the tonal balance is too bright, with excessive highs.
Selecting the 'Audyssey' curve only makes it worse, it ends up with a notch in the upper midrange, too bright, and the highest frequencies attenuated.

Also, the automatic settings for subwoofer crossover and distance is far off, causing the bass to be very strange.

All this can be confirmed by measuring the systems frequency response - which shows the loudness as a function of sound frequency.

Because Audyssey internally uses a different method to find the response it uses to calculate the correction, the result will vary depending on the speaker and room interaction. 
For some speakers and rooms it may work, for others, not so.


Frequency response, No Audyssey and Audyssey Flat with automatic settings


The red curve is the calibrated system without Audyssey, a fairly even response with a slight downwards tilt as the frequency rises.

The grey curve is with Audyssey Flat correction enabled, and all settings left like the automatic calibration suggested. There are severe dips in the bass range, and level above 2-3KHz is too high, causing a too bright sound balance.

These curves are not smooth, they show peaks and dips caused by room reflections. They are presented like this, with 1/24 octave smoothing only, so that we can see what is going on.


Restore settings

By restoring settings for subwoofer crossover and distance and level, the bass response is restored.
Crossover is set to 120Hz, distance is 5.40m.
 

Frequency response, Audyssey Flat, restored settings

The green curve is Audyssey Flat with tone control adjusted and crossover and distance settings restored. With no tone adjust the Audyssey Flat is equal to the grey curve above 1KHz. 


Adjust tilt

By using the tone controls it is possible to fix the tilt of the frequency response to match the around 3dB/decade fall, which will also give a flat on-axis response in this room with these speakers.

The tone control in this AVR is implemented in the master volume control circuit, and this same chip is used in many, if not most, newer AVRs.
This means the tone control works independent of the Audyssey processing, and it also happens to follow a nice tilting curve when adjusted.

Adjusting bass to +1dB and treble to -5dB causes the curves to match, adjusted by observing the frequency response measurements.
It is possible to adjust this by ear, using pink noise, and adjust until the tonal balance of the noise seems the same for no Audyssey and Audyssey with tone adjustment. 

Frequency response, No Audyssey and Audyssey Flat with tone control adjusted tilt


Now we can see that the tilt of the frequency response matches for both without and with Audyssey Flat enabled. The 1/1 smoothed curves show the averaged tilt of the reponses.


Further improvements

This set-up should be re-calibrated to get the best possible response in the 80-200Hz range, by selection of crossover, distance adjustment and Audyssey recalibration.
Here is how I would proceed:

1. Equalize the subwoofer system to flat using the subwoofer DSP.
2. Run Audyssey to calibrate.
3. Re-enable the house-curve on the subwoofer DSP.
3. Adjust crossover and distance for subwoofer to get the best possible response with Audyssey enabled.

Saturday, March 29, 2014

Audibility of peak limiting


Peak limiting and clipping is used to make music seem louder, but does it really work that way?
No - removing the peaks actually reduces impact and brutality and makes it sound flat and boring.


Intro

Typical sources of peak limiting in audio reproduction are loudspeakers and power amplifiers.
This can obviously easily be avoided by turning it down a bit, or get larger speakers with better sensitivity.

Music can also be destroyed in the production process, where removal of peaks using brickwall limiters is more common than not today.
Dynamic compression, brickwall limiting and peak clipping in music is well known today as the Loudness War.
The kind of signal processing used causes loss of transient peak amplitude and adds distortion.
It is this type of signal destruction that is investigated here.

Upon visual inspection one can see that the limited waveforms are clearly changed, and it may be difficult to understand why this is not also very easy to hear.
But the loss of signal amplitude happens in a very short period of time, it is not necessarily easy to detect unless you know what to listen for.
There is no apparent change in overall sound level, and the tonal balance is not changed at all.

Hypothesis

Reduced transient peak amplitude will cause loss of tactile impact and punch when played reasonably loud through loudspeakers.

Method

A music signal with very dynamic and transient content - mostly drums - is processed with a limiter to create peak limited test signals.
Three different test signals were made - original, -3dB limited and -6dB limited.

The original and the distorted signals are ABX-compared listening on headphones and on the big system.

Test signals


Results

The less -3dB limited signal was difficult to distinguish from the original, and the difference was perceived as more noticeable when playing reasonably loud on loudspeakers.
The difference was noticeable also on headphones, the limited signal seems slightly flatter sounding on the loudest drum hits.
On loudspeakers there was a barely noticeable loss of physical transient impact.

For the heavily -6dB limited signal differences could be verified as audible even when not playing very loud, there was distortion causing a reduction of clarity and perceived sound quality.
On loudspeakers there was a clearly noticeable loss of physical impact.

ABX results, headphones:
Limited -3dB: Total: 8/10 (5.5%)
Limited -6dB: Total: 10/10 (0.1%)

ABX results, big system:
Limited -3dB: ABX: 16/14/0.21%
Limited -6dB: ABX: 10/10/0.1%

Conclusion

The results does not dismiss the hypothesis that peak transient amplitude is important for tactile impact and punch.

The less -3dB limited signal was difficult to distinguish from the original.
When looking at the waveforms the signals are clearly different, but when listening the differences are not so easy to detect reliably.
Even the -6dB limited signal could pass unnoticed if there was no original reference to directly compare it against.
Also, the reproduction equipment - mainly speakers - must be able to reproduce the transients without additional distortion.

The combined results from this limiting test and the phase distortion test indicates that it is possible for such errors to be introduced unnoticed in the music production process - they simply can not hear it.

The important part is that the severity of the transient distortion depends on how you listen.
When sitting down to really enjoy your favourite music, you turn it up, and that is when the lack of life and dynamics is most apparent.

Loud music production style utilizing heavy compression and limiting has several other negative effects on sound quality.
The negative consequences of lost transient impact investigated here is only one part of the destruction.